Showing posts with label 3D Art. Show all posts

Thursday, August 4, 2022

Portfolio 3 - Week 3 Thurs - Final Display

 This has got to be my favorite project here in FIEA. Doesn't mean I'll change to a character Artist but I got to learn all these different techniques for the past few weeks on something new for me. It was a pain trying to get the UVs and pose the character into different poses. With the help of Mixamo, I got the poses and froze the mesh in Maya so that it could be a static mesh and not have a skeleton since that's not allowed as Nanite. This was very challenging but well worth it.


Monday, August 1, 2022

Portfolio 3 - Week 3 Tuesday - High Res

 Since I am following the Nanite workflow, this week has been a little difficult since I am using a different approach to a character. This meant that I had to watch a ton of tutorials from both nanite and ZBrush pipelines and trying to combine the two. I managed to get the high res done. I am currently working on UVs since its taking a while to unfold them. I also tested the character mesh on Mixamo but it didn't work. I am going to try auto-rig in Maya (As suggested for a static mesh by Tech Artists). 

Schedule: 
Week 1: Proxy Sculpt
Week 2: Proxy Sculpt/UVs
Week 3 Tues: High Res/UVs/Practice Rigging Techniques
Week 3 Thurs: Fully Textured with UVs and Posed for Final Display

UPDATE: File got corrupt while copying UVs and the last file I can access is from 2 hours before the incident 😓


Monday, July 25, 2022

Portfolio 3 - Week 2 Proxy Character cont.

 I've decided to stick to one project since the time we have is shorter than usual. So I'm sticking with the character, Mirage from Apex Legends. Not only is this my first time making a character, but I have to follow a different workflow to convert it to nanite.
 I have to get the base mesh first, UVs, detail, texture. Since this is new to me, I'm trying to do as much research as I can to make Mirage using good techniques. This is taking A LOT longer than expected however. I haven't gotten the UVs done because I'm still doing my best to get base meshes on his body before continuing. 
 Putting most of my focus on the head was probably my biggest mistake. I tried to make it match as best I could but got a little too carried away.

New Schedule:

Week 1: Proxy Sculpt
Week 2: Proxy Sculpt / UVs
Week 3 Tues: High Res/UVs/Practice Posing
Week 3 Thurs: Fully Textured and Posed for Final Display


Monday, July 18, 2022

Portfolio 3 - Week 1 Block out / Proxy

 Since the 3D Research assignment was due this week, I focused more on that than I did for this week's project. It was tough making the clothes for the character. Since it was really my first time making one, and spending most the time in ZBrush, I had to research videos on ZBrush to familiarize myself with it. Maybe it would've been better to stick with a character rather than over scope myself and do both an environment and character. 😅

Week 1 - Block Out Level / Proxy Sculpt / Character UVs
Week 2 - High res character / Character UVs / Proxy Environment
Week 3 - Game Res Environment / Textures for Both
Week 4 - Final Textures / Lighting Passes / Final Display of Work


Tuesday, July 12, 2022

Portfolio2 - Week 4 (Final Display)

This has been a wild week with capstone, common art, and 3D. I was able to texture the Ghost Cockpit but I feel like I could have made it look a little more realistic. But since it's sci fi, most of it would pass and it won't be considered cartoony. But I'm glad I got to recreate an environment from an existing IP. It felt like actually working on a real Star Wars project.

Schedule:

Week 1: Proxy out scene / Create Skysphere
Week 2: High Res / Game Res
Week 3: High Res / UVs / 1st Bake / Create Skysphere
Week 4: Fully Textured / Final Display


Friday, July 8, 2022

Portfolio 3 - Reference and Schedule

 For my final portfolio piece of the Summer semester of 3D Art, I'd like to incorporate a character in my environment. This character won't be playable however, it'll just be a statue sculpt. I have never made a character before and would like to make one before I leave FIEA. I will be using nanite in UE5, as its part of my research project. So I'll follow a different pipeline to bring this sculpt into my environment. I will be using Megascans for my foliage to focus on the statue and the rest of the environment.

Schedule:
Week 1 - Block out of level / Proxy sculpt / Character UVs
Week 2 - High res character and environment
Week 3 - Game res environment / First pass of textures for both
Week 4 - Final Textures / Lighting passes / Final Display of Work

This environment will be a garden with a statue in it. I want to push for different statues but that'd be over scoped within this time, so I'm sticking with one for now. Since I want to create more in the future, I will sculpt him in an A/T Pose so that I can rig the mesh and have him in different poses. 

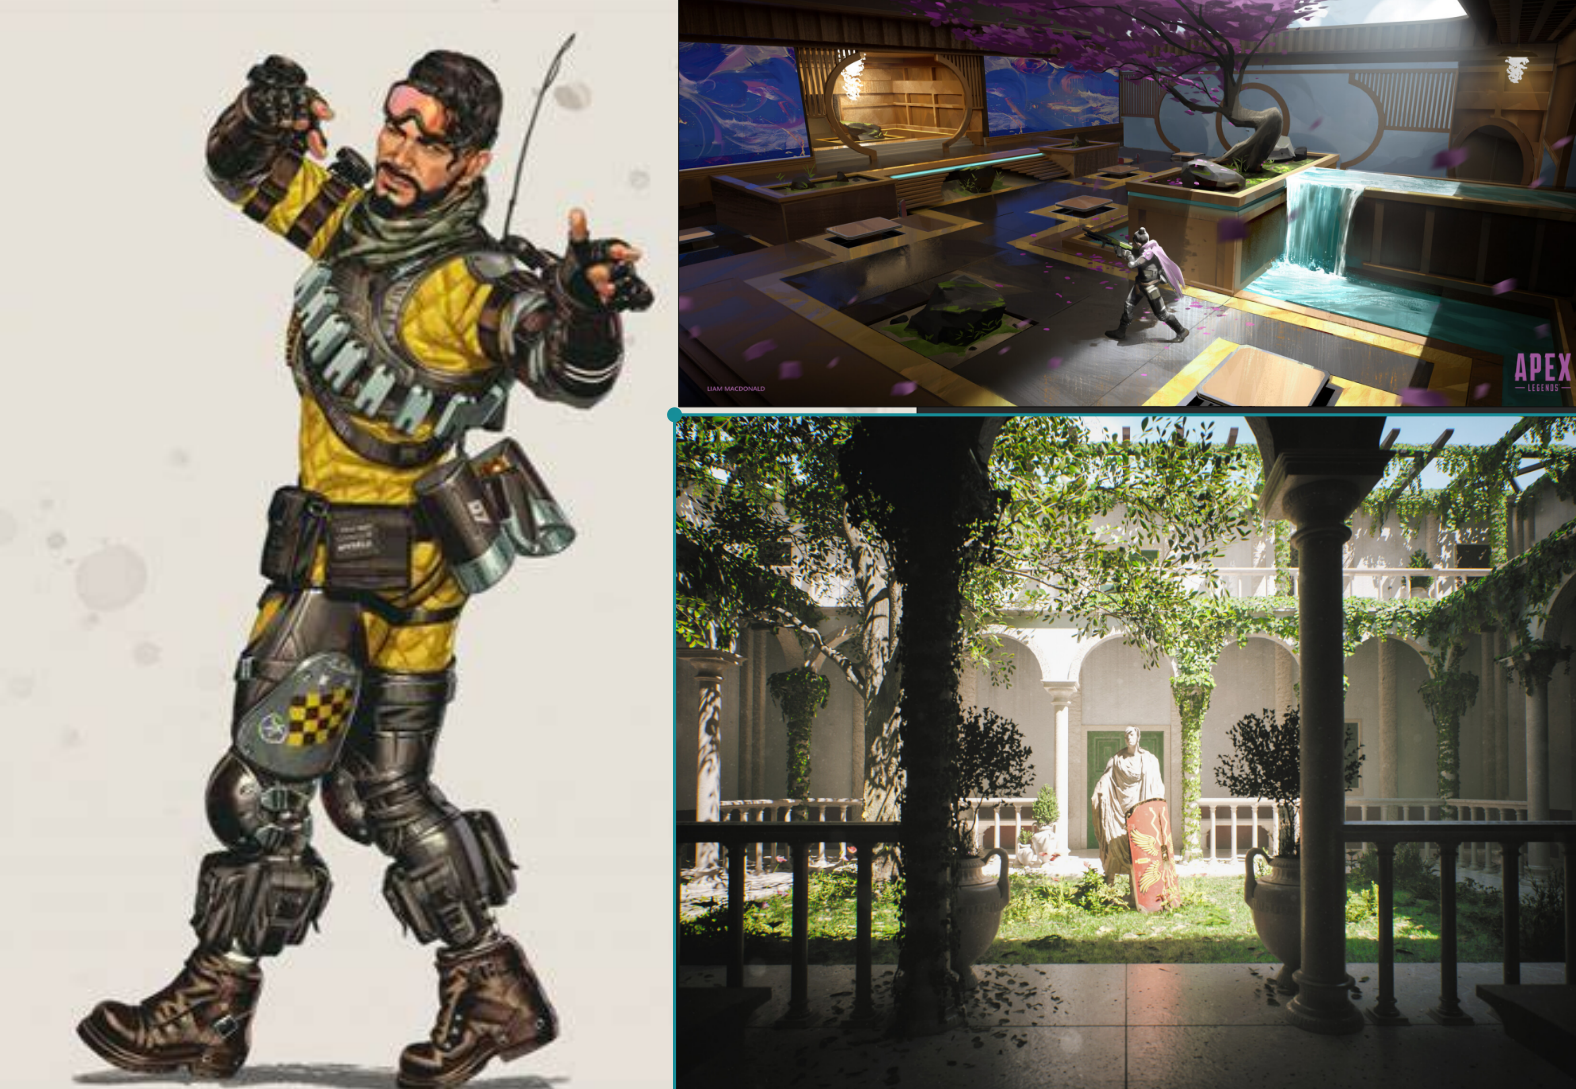
I chose this character, Mirage from Apex Legends, because I feel like having a garden of statues would be something that actually fits his personality since he's so full of himself. Not only that, but his character is known to create different holograms of him, so having multiple statues would fit too. 

The environment would have this general garden walkthrough with the statue(s) as the main piece that draws the viewers eye. 
To make this fit in the same universe as the character, I used some reference of an upscale outdoor lounge from Apex Legends.
This outfit of Mirage's is the one I am referencing for the sculpt. It won't have too many intricate details as it would just be a sculpture.
These are my main references I am using. I hope to use the layout of the garden (below), with the architecture from the game (top), and the character with the same pose for the statue.


Monday, July 4, 2022

Portfolio 2 - Week 3

This week, I modeled as many details as I could that had to be modeled. Everything else, could be textured in for the next week. There are plenty of buttons, but most don't have a silhouette that pops out, so I'll just stick them in the walls. I had enough time to create the skysphere this week instead of next week. I made it so that there is depth to it when looking out the ship. The material node was a reflection vector, which made it "move" however you looked through the camera. 

Schedule:

Week 1: Proxy out Scene / Create Skysphere
Week 2: High Res / Game Res
Week 3: High Res / UVs / First Bake / Create Skysphere
Week 4: Fully Textured / Final Display


Monday, June 27, 2022

Portfolio 2 - Week 2

 This week has been quite a struggle. Been battling a stomach bug this week which took time and energy to complete this week's work. However, I did manage make more tweaks and assets to match the references. I did more polishing and separating of the assets, since I made the proxies "watertight" (I wish I hadn't). I also created the frame of the cockpit window, which was a long game of trial and error. 

Schedule:
Week 1: Proxy out scene / Create Skysphere
Week 2: High Res / Game Res
Week 3: High Res / UVs / 1st Bake
Week 4: Create Skysphere / Fully Textured


References:


Monday, June 20, 2022

Portfolio 2 - Week 1 (Proxy)

 My goal is to make the Ghost ship from the animated series 'Star Wars Rebels' and to complete the steps following the schedule. Though I was not able to create the sky sphere this week, I did manage to proxy out most of the environment. The toughest part was creating the window, as there's another room below the cockpit that shares the same window; its continuous. 

Week 1: Proxy out scene / Create Sky Sphere
Week 2: High Res
Week 3: Game Res / UVs / Create Sky Sphere
Week 4: Fully Textured / Final Display


Here are the main references I was following:


Tuesday, June 14, 2022

Portfolio 2 - Reference and Schedule

 For the next project, I will be working on the cockpit of the Ghost from the animated show, Star Wars Rebels. I have discussed the art style with Nick about it being realistic since I plan on being in the themed industry career field. I will be showing it off in Unreal Engine 5 so that I could create a space skysphere.

My Schedule:

Week 1: Proxy / Sky Sphere Created  
Week 2: High Res 
Week 3: Game Res / UVs 
Week 4: Fully Textured / Final Display


Here are references gathered from the show itself.

Monday, June 13, 2022

Portfolio 1 - Week 4 (Final Display)

For the last week of this project, I was able to complete all the steps I had planned just in time. I am happy with the final result of the Barbarian Bar. It was a bit rough trying to get it in to Unreal Engine 5 because I encountered some bugs such as the foliage disappearing (Which I had managed to fix). But overall, it came out pretty good and I'm liking the new look with a more realistic take.

Ref:

Final Display:


Monday, June 6, 2022

Portfolio 1 - Week 3 (Game Ready)

 This week was the most difficult with time management. However, I did more than I was hoping to for this week's schedule. Other than a lighting pass. I will have to re-adjust the last week's plans. 

Schedule:

Week 1: Proxy Model + 1st Lighting Pass
Week 2: High Res Model
Week 3: Game Ready Model + UVs + Material IDs + Start Texturing + 2nd Lighting Pass
Week 4: Add foliage + Final Textures/Renders (2nd/Final Lighting Pass)


Monday, May 30, 2022

Portfolio 1 - Week 2 (High Res)

 For this week's project, I chose to make the high res model so that I could later bake it onto the game res in Substance Painter. The first image is the reference I found online. This is similar to the 'How to Train Your Dragon' art style but not official artwork for it. The second image is from Maya, before importing it into ZBrush. The third is in Zbrush. I didn't do much sculpting because halfway through the assets, I figured that there isn't much silhouette change and can easily be textures instead.


Wednesday, May 25, 2022

Common Art Sprint #1 Delivery

This Sprint, I was working on refining assets based off of last semester's feedback. I have made EKG monitors that will be placed next to the operating table. These are the closest I can get to a Blade Runner aesthetic. For the future, I will have to redo all tools to look as if they were in that universe. As for the texturing, I will have to match it as best I can with materials from the Blade Runner movies. There will no longer be placeholder textures since I will be moving to the next step from C level.


If not playable, access with this link:  Common Art Test 5/24/22


Monday, May 23, 2022

Portfolio 1 - Week 1

This week, I planned on creating the proxy for the 'How to Train Your Dragon' environment along with the first lighting pass in UE5. The first image is the reference I will be using for the overall project. The second, is my camera matched perspective for a sense of scale and right positioning. The third is the outcome in Maya with a mannequin there for scale. I know that it is not exact, but since it is an illustration and no known focal point, I did my best to align the mesh with the reference.


Here are two angles from my first lighting pass in UE5. I felt that it wasn't the strongest but was in the right direction. With it, I noticed that some of my proportions are off based on the lighting itself.